
|
|
The bass modification was for instruments below serial number D1000A. Depending on the serial number of the bass you remove the scratchplate followed by the screw
on the back of the pickup - or, if the bass is a very early model remove the two screws that secure the chrome pickup plate down. Finally, loosen the three screws that
make the electrical connection from the pickup to the control cavity and pull the pickup out.
|
Take notice of a short lead wire protruding from the pickup and solder that wire to the front terminal lug on the pickup itself as per the drawing (the lug closest to
the neck as seen above with the white wire attached to it). More information on why to do this first step can be read in the pickup section for the bass guitar. Photo
courtesy of Mr. Jim Edwards.
For those who didn't want to mess with such things, or for those just plain uncomfortable - an alternative replacement bass pickup was available with the short lead
already wire soldered to the pickups terminal strip, as well as the required capacitors to complete the job. The last step is to replace the .05µµF capacitor
with a .1µF capacitor. This modification will yield a more balanced response coming from the bass as earlier model basses were known for having very bassy E & A strings,
and trebly D & G strings.
The second bass modification was for basses with a serial number below D2000A and is a way to update the Dan Armstong bass with a toggle switch. A drawing type template
was included depicting where to drill a ½" hole in the scratchplate for a double pole - single throw switch. Once this switch is mounted, wires get relocated and
a .1µF capacitor gets installed into the circuit while the .05µµF capacitor gets doubled.
The resulting switch functions are such that with the switch in position #1 forward (toward the neck) results in
the deepest possible tones from the instrument with bassy E & A strings - coupled with more trebly D & G strings
(or in other words, it will sound and behave just like the earliest models Dan Armstrong basses). With the switch in
position #2 back (towards the bridge) results in a balanced sound from the instrument (or in other words, the sound one
gets after one completes the first modification mentioned above). The switch, then, simply allows the player the choice
between the two, and when used in conjunction with the tone control, makes it handy by allowing ever greater control
over the sound of the bass.
Alternatively, to take a newer model Dan Armstrong guitar or bass, and wire it like an earlier model, all one needs to
do is reverse the wiring instructions given in The Ampeg March 8, 1971 Bulletin. This Bulletin, complete with
an early Dan Armstrong owners manual (which contains the wiring schematics of the 1969 model guitars and basses) are
available in the Brochures section of this site. For those requiring more information on this subject, an excellent guide
to the wiring changes over time can be viewed at
the Dan Armstrong Registry.
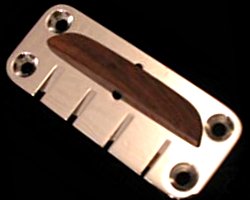
The Dan Armstrong guitars featured a combination bridge & tailpiece assembly that was styled after the
Danelectro line of instruments. As seen above, the early models were equipped with a fully chrome tailpiece that employed a wooden
bridge that could be slid back and forth on the tailpiece in order to get the best overall intonation that the
instrument was capable of. These saddles came in three different sizes. Low, for the lowest possible string
action, medium for average string height, and high, for the highest possible action. Many bottleneck slide players
chose the latter as it is ideal for bottleneck playing styles where one does not want any buzzing to occur as a result
of the slide bumping against the frets. For other adjustments, inserting or removing shims from under the saddle
allows for minor changes in string height.
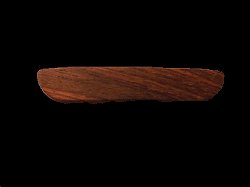
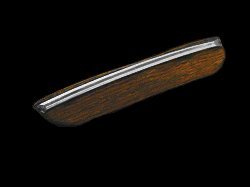
As seen upper left, the bridge saddle itself is comprised of a strip of rosewood that resides on top of the chrome
tailpiece. Strings leave the tailpiece and travel over this saddle making their way to the nut on the
headstock. The entire saddle can be slid forward or back or - if warranted - one can slant the saddle, thus making
one side of it forward on the tailpiece, while the other half of it swings to the back for intonation purposes.
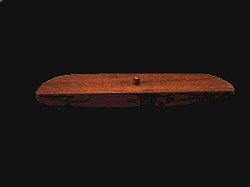
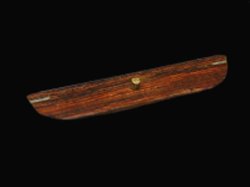
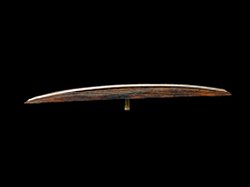
As seen upper right - the saddle is equipped with a brass pin that protrudes from the bottom. This pin was made to
glide back and forth in a channel on the tailpiece that can be seen in the photos above. Although this channel allows
for the forward & backward travel of the saddle for intonation, Dan always maintained that "the real purpose
of the pin and the channel was to help keep the saddle from any side to side slippage."
While the pin & channel would prevent any side to side slippage it couldn't solve the one major issue that many players
were experiencing, and that was the unwanted forward and reverse travel of the wooden saddlepiece as it slipped on the
smooth surface of the chrome tailpiece - even with the strings tuned to pitch. While some of this was truly slippage
- due to the fact that some players just have a hard & aggressive playing style, much more of it was due not to
'slippage' but rather 'movement'.
Movement occurred when players changed their guitar strings. Like today, many players of the time removed all of the
strings before installing a new set. Basically because it gives a person an opportunity to clean the instrument in
areas that are otherwise inaccessible when the strings are on. While this practice is fine on many instruments, it was,
and still is, not advisable on a Dan Armstrong guitar or any guitar that employs a combination bridge & tailpiece like
this.
Instead, it is suggested to change strings one at a time, due to the fact that when one removes all of the strings the
rosewood saddle can move out of position and even fall off the guitar. While repositioning the saddle is a relatively
painless process today, few players of the time had the knowledge or equipment to help them in this endeavor.
Worse yet, many players, even some professionals - didn't know what intonation was - let alone how to set it. All that
they knew was that once they put the saddle back on and strung the guitar back up in tune, it didn't sound the same
when played as it did before. According to Dan "This is one reason the guitar models were used so much for slide
guitar. Slide players never really needed the intonation to be so exact. Couple this with a two octave neck, double
cutaways for reaching the upper registers, and the tremendous sustain these instruments were capable of and you have a slide players
dream guitar."
Both Dan and Ampeg tried in vain to educate not only players, but even their product dealers. They wanted to get the
word out to as many as they could in order to advise players to change their strings one at a time so as not to mess
up the intonation. Furthermore, they schooled most, if not all of their dealers on how to set the bridge saddle piece
in the event it ever got moved or removed in any way. Essentially it's an easy setup - all ones does is use a strobe
tuner to get the two outside E strings intonated and the rest falls inbetween. "It's not perfect by any means"
Dan once told me, adding "I know it's the guitars achilles heel - I had planned a better type of bridge/tailpiece unit
but I was running out of time as my contract with Ampeg was about to expire for turning in the prototype, and so I had
to make a tough decision." Even then, some players argue that this type of bridge/tailpiece was the correct
decision as in their opinion, it's the rosewood bridge saddle that gives these instruments the warmth they need.
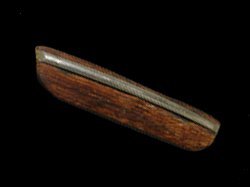
Despite that, later model Dan Armstrongs were equipped with a newer style bridge saddle. As can be seen upper left,
the rosewood saddle was now adorned with a fret across it. When I asked Dan about it he mentioned that "the fret
serves two purposes actually. First off, it helps a little bit with the intonation, it gets it on a little better."
The concept of placing a fret on the rosewood saddle was allegedly concocted by Randy California. In an interview Randy spoke about his 1969
Dan Armstrong guitar stating One thing that I'm quite proud of is the fact that Dan Armstrong later incorporated something I'd done to my
Sears Silvertone. I used to lay an unwound 20 [gauge string] over the wood bridge, and I took that guitar to New York to show them [Dan] - and Dan
ended up putting a fret across his wooden bridge after he saw what I did.
Dan continued stating "but what I love about the fret is that it gives the instrument more zing which I felt was needed." I remember
asking him "ummmm......zing??" to which he replied "more treble - more high end." We went on to
discuss how some players liked the all wood saddle over the saddle with the fret and Dan was correct to point out that
at the time both saddles with, & without a fret were available - and in all 3 heights.
The saddle shown above left and right is the lowest saddle. At left, the saddle is so low in fact, that from the bottom side of the saddle the tangs of the
fret can be seen at the edges. At right, a straight-on view of the low saddle.

|
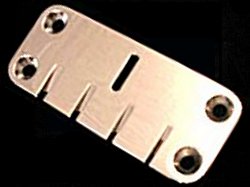
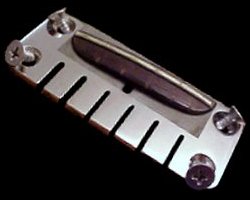
In addition to the new style saddles, Dan made a design change to the tailpiece to help players who were experiencing
the slippage problems mentioned above. As seen upper right, later model Armstrongs had a section of the tailpiece
sandblasted which roughed-up the chrome surface just enough to keep the rosewood saddle securely in place, even for the
hardiest of players.
|
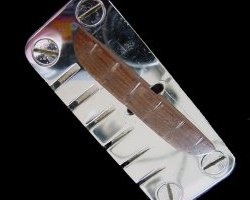
The tailpiece was secured to the top of the acrylic body using four screws. It was too time consuming to both drill and
tap threads so Dan decided to use self-tapping screws. As seen upper left, the screws used on the earliest tailpiece
were straight head screwdriver screws, while later models - as seen upper right - were fitted with
the more familiar 'phillips' type screws in late 1969 or early 1970. According to Dan the switch was due to the fact
that there was simply too much slippage occuring on the production floor when inserting & self-tapping the straight
head screws. This sometimes resulted in marred, or even scarred up bodies that had to be either polished out or thrown
out altogether, all depending on how badly the damage was. The phillips screws worked better, with less problems and
were thus used throughout the remainder of the production of the Dan Armstrong instruments.
Notice the shallow cut string slots used on the earlier earlier tailpiece over that of the later model which are cut
much deeper. This change occured as a result of customer complaints. More about it can be read in the guitar section.
continue
menu
Names and images are TMand © Dan Armstrong / Ampeg. All rights reserved.
All other names and images are TMand © of their respective owners. All rights reserved.
|
| |