Often times Email comes in that isn't about Dan or the history of his instruments. Instead I am asked how to do things, or where to get parts
that will work in place of the originals that are no longer available. Years ago I got some factory parts simply by writing Ampeg, but those
days are long gone and Ampeg has been acquired by Yamaha - a company that so far, hasn't yet produced an Ampeg instrument - making replacement
parts difficult, if not nearly impossible to locate.
While finding factory parts is nearly impossible, there are a few items that I've found that should help without making alterations to your
Dan Armstrong · Ampeg instrument. These are a few of the most common ones that have passed through my e-mail.
Over the past few years the number one request is in regard to the pickup selector switch on the guitar model. After five decades the switch on
many guitar models have simply worn out, resulting in many guitarists asking me about a replacement as many toggle type switches will not fit
within the limited confines of the instruments control cavity.
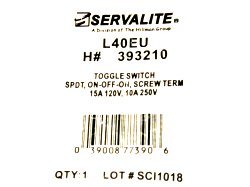
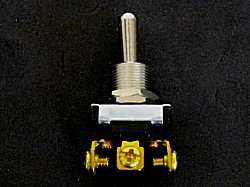
Above left is my answer. A Servalite L40 EU - H# 393210 'SPDT On-Off-On' switch is the one you want. It's virtually identical to the original
Carling Technologies switch that came inside your Dan Armstrong guitar. At right, is the switch in its entirety. It's shallow enough to fit
within the confines of the control cavity on your Dan Armstrong guitar. A complete, detailed 'step by step' instruction guide with photos will
show you how to install and wire up this switch in your guitar which can be read in its entirety in the hardware section of this site.
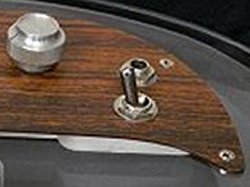
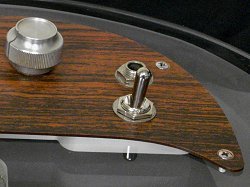
As seen above left and right, the Servalite switch has replaced the original Carling Technologies switch in one of my Dan Armstrong guitars. It
not only works but even 'feels' just like the original. Had I not done it myself, I would have never known it's a replacement.
|
Pickups for the Dan Armstrong · Ampeg guitar remains high on the list, coming in at second place. Many readers
wish to know where one can obtain original vintage pickups.
Unfortunately the only way to acquire them today is through the online auctions on the Internet as they seem to pop up from time to time.
|
As seen above, one alternative to online auctions is to contact Kent Armstrong
who has all the specs and schematics for the original pickups made back in the day and can build one that sounds exactly like those originals.
In addition he can custom wind almost any kind of pickup you want that will slide into the Dan Armstrong guitar. Seen here his new rock treble,
or RT pickup which is inserted into the body of my 1969 Dan Armstrong guitar. An original RT pickup is lying
nearby for reference.
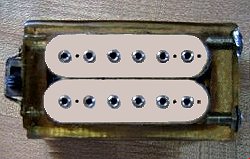
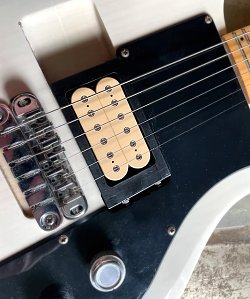
As seen above left and right, some prefer different types of pickups and have come up with some innovative and
interesting designs all their own. Some, like the above.... I rather like, simply because the design does not alter the instrument,
for as seen here - what looks like a DiMarzio 'super distortion humbucking pickup' has been somehow mounted onto
what looks like a brass plate with a 90º angle on one end where two female banana plugs are affixed. The output wires of the pickup
are soldered to these plugs and complete the connection to the instruments control cavity when the pickup is slid onto the male plugs of
the instrument.
One thing not like Dan's pickups can be seen on the opposite side of the banana plugs. From what I can make out, it appears to be a 'tab' of
some sort, which has been attached to the brass plate. I can only speculate that with the exposed coils of the DiMarzio, pressing on them hard
enough to insert &/or remove the pickup was likely to dislodge the coils from the brass plate, or at the vesy least rip the pickups' lead wires
from their respective banana plug. Whatever the case, it seems likely that this is why the tab is there - being the pickup is not encased in
resin.
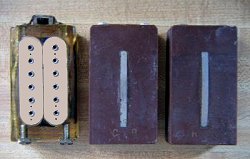
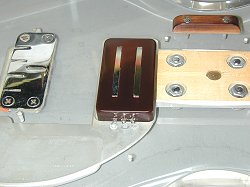
At left and right, a unique way of getting industry standard pickups to fit in the Dan Armstrong guitar without any modifications to the
instrument or the pickups. A kit can be purchased on Reverb where you assemble a few parts to get most any humbucker to fit onto the banana
plugs of the Dan Armstrong. As seen on the left, #1 - take the threaded (and hollowed) tubes and slide them into the box. Then slide the metal
rings #2 over the threaded tubes, then thread the nuts #3 over the rings and tighten. Then solder the two pickup wires to the rings. Lay the
bottom of the pickup onto the plate and run pickup height adjustment screws into the holes on the bottom plate #4. Finally, use the screws #5
to attach the metal bottom to the enclosure. Over at the right, the pickup in its enclosure.
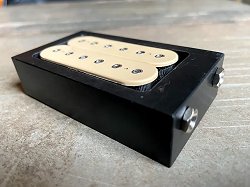
At left and right, the pickup, slid in and at rest in an AMG100 guitar that has connections just like the clear acrylic Dan Armstrong guitar.

|
At left, a Seymour Duncan pickup residing in the channel of a re-issue Dan Armstrong guitar. This is a great way to try different pickups
without altering the instrument. To acquire one contact the seller kripnum_obyd5p on Ebay or
KENNYs Gear Locker on Reverb.
|
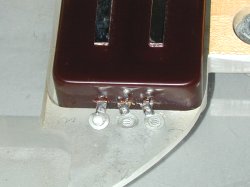
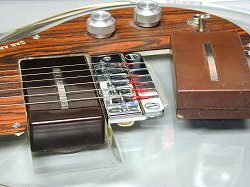
As the bass pickup on my 1970 Dan Armstrong · Ampeg bass went out, I placed a call to Kent
Armstrong who built me a replacement pickup built just like the original. In addition, he also built me a humbucking
bass pickup which can be seen here at upper left in my bass. At upper right, notice how well the pickup fits, and in
particular, notice how the 3 rings match up to the threaded holes in the acrylic body. These holes are the original
holes tapped for the screws that make the connection to the rest of the guitar's circuitry. All of which can be better
seen in the enlarged view.
|
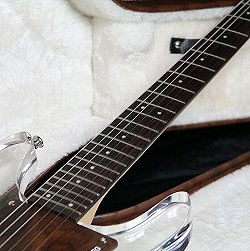
Some guitarists who own an Dan Armstrong · Ampeg guitar have asked about how to acquire a replacement neck. Up until now I
had no answers for them other than to tell them to keep checking online in the hope that one turns up for sale.
It was totally by accident that I ran across what might be a reasonable alternative. There is a seller on EBay who makes Dan Armstrong copies.
Ironically, this same seller also happens to sell Dan Armstrong copy necks individually.
|
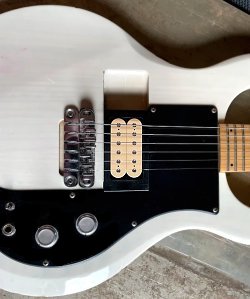
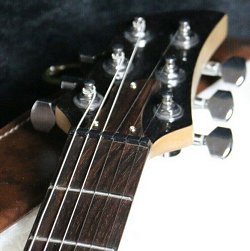
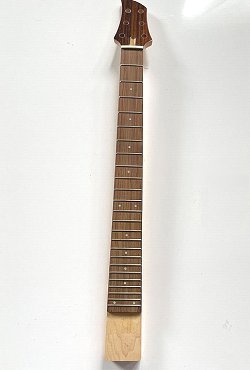
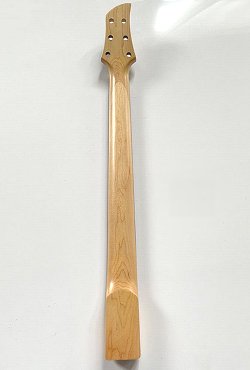
Above left and right, these necks do not come with tuners but were installed here for advertizing purposes.
As seen above, the maple neck features rosewood fingerboards with 24 frets and small dot position markers. It also features a headstock
fashioned after the Dan Armstrong model. At this time, it is unknown if the tongue of the neck seats firmly into the neck pocket of the
Dan Armstrong · Ampeg acrylic model. Likely it will be close, but may not be perfect. However, it should be possible to
shave the tongue portion down or, build it up, if necessary - to seat firmly into the neck pocket of a Dan Armstrong acrylic body. Naturally,
holes would have to be drilled into the tongue to accommodate the carriage bolts of the older, original instruments, or the T-bolts of the
newer reissue instruments. They even sell left hand models like that seen in the neck photos above. When making holes in the tongue to accept
carriage bolts, or T-Nuts, care must be taken to proceed slowly and carefully so as not to crack and splinter the wood.
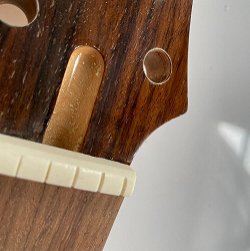
Above, a closeup of the headstock on one of their necks. By looking at the width of the string slots in the nut, you can see this neck is for
a left handed instrument, or a musician that wants a reverse headstock on a right handed model - though the nut would have to be changed out if
so. At right the seller has a good rating on EBay. I may purchase a right handed neck, just to try it out as they are quite affordable. Below
are the links to both right, and left handed neck models.
As per my disclaimer I cannot guarantee anything in
regard to these necks until I actually try one myself, so 'Caveat Emptor' as they say.
For right handed models click here.
For left handed models click here.
|
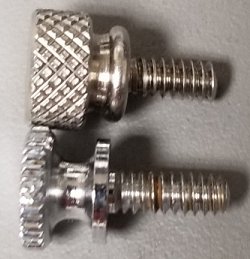
Another item that often comes up is about the screw that secures the pickup to the acrylic body. If you are seeking an original part, then
your best bet is to keep watching the online auctions for one. Until one can be located the best alternative is to buy, or make one yourself.
Fortunately, nothing has changed over the years and a 6-32 machine screw is all that is required. As can be seen at left, (seen better in enlarged view)
on the table top from left to right lie the original pickup screw, a 6-32 flat head slotted machine screw, and a 6-32 thumb screw.
|
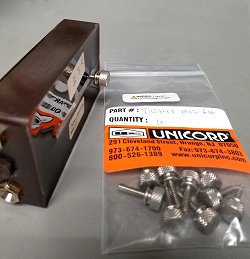
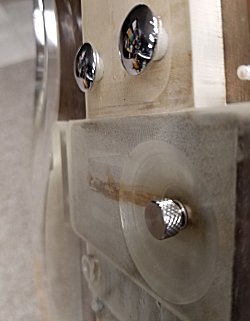
Also, as seen above, one of the 6-32 flat head slotted machine screws is turned into a very early 1969 prototype pickup
(notice the label on the pickup) while a 6-32 thumb screw can be turned into a newer Kent Armstrong pickup - attesting
to the fact that the 6-32 thread works on both the older pickups and the new. The threaded portion of the screw needs
to be 3/8's of an inch long to secure the pickup to the body properly. The slotted screws I had were two inches long
so I just used a bolt cutter to trim it to size.
Seen at left, as of this writing
Amazon
has a stainless washer-faced 6/32 knurled thumb screw that looks a great deal like those seen on the Dan Armstrong reissue guitars, and would likely
be the easiest to use when it comes to changing out pickups. As per my disclaimer
I will mention that this product, like anything ever manufactured has the
usual California Proposition 65 Warning which may concern some.
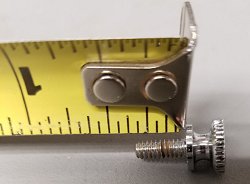
The length under the head is 1/2" long. At right is an original Ampeg pickup screw
from my 1969 Armstrong guitar. As seen here, the threaded portion (under the head) measures in a little over 5/16" long which means that these
replacement screws are a bit longer than the factory original, or at least the 1969 original. Prompting a test.
An interesting discovery. At left, a Kent Armstrong RT pickup. Notice how far the screw turns into the bottom of the pole piece. When I slid this
Kent Armstrong pickup into my 1969 Dan Armstrong guitar and used this thumbscrew, I was able to turn the screw all the way in, nice and snug with
no spacers or anything. However, on the right, the very same screw can be seen turned in as far as it will go - but this time it's turned into an
original Dan Armstrong ST pickup from back in the day. Notice the difference - as it only turns into the pickup a fraction of the way - so, in order
to use this pickup screw with older, original pickups - the screw would have to be shortened by using a threaded bolt cutter.
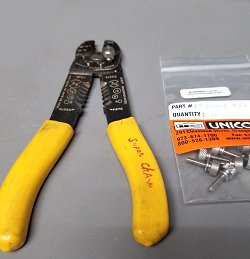
As seen at left, I took the screw I had been using and turned it into my threaded bolt cutter (which can also strip, and crimp various wire
sizes) and, using a tape measure, I turned the screw into the 6/32 threaded hole. At right, you can see the threaded portion of the screw as
it makes its way through the jaws of the cutter.
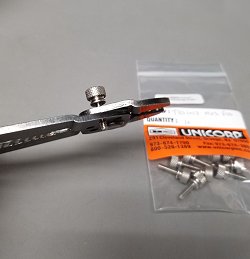
As seen at left, knowing that a couple of threads are in the jaws of the cutter itself, I left around 3/16s inch or so out of
the cutter. At right, I cut the threads a bit shorter than expected - but that turned out to be a good thing, as seen in the photos below.
At left, the pickup screw tightens into newer and older pickups nice and snug. Here it is turned into my aforementioned 1969 Dan Armstrong
ST humbucker. At right, and planing down the body, the screw can barely be seen, meaning it's nearly flush with the backside of the acrylic
body.
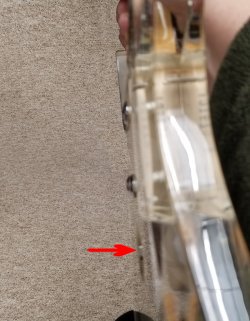
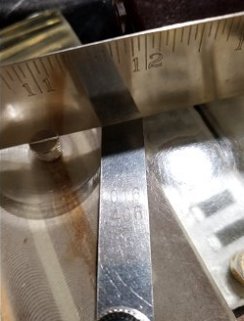
At left, I laid a metal straightedge across the body and over the head of the pickup screw in order to see how much, if any, that the screw head
protrudes from the back of the acrylic body. As seen here, you can make out just a sliver of black to the right of the screw so I decided to
measure this gap.
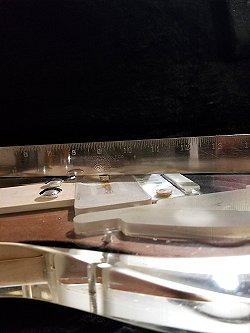
At right, and seen more easily in the enlarged view, a feeler gauge shows that the head of the pickup screw (when tightened securely into my
pickups) protrudes .016" or about a 64th of an inch from the body - much less than the carriage bolts that attach the neck to the
acrylic body. Speaking for myself, this is negligible, but if it's an issue, one can always mil, or grind down the head to size - or, trim a few
more threads off the screw.
|
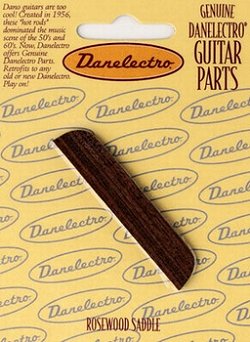
Replacement bridge saddles is another on the list. One option is to have the bridge saddles custom made out of rosewood or other materials
at specialty shops.
An alternative is to purchase a Danelectro rosewood saddle and trim it down in size for your needs &/or playing style. The top can be shaped to
the 9.5° radius of the guitars fingerboard, or to the 7.25° radius of the bass guitar fingerboard using the various
radius gauges available online as a guide - you can shape it to perfection.
Additional strips of wood can be placed or glued to the bottom of these bridges for those who prefer a higher playing action or require a higher
action for slide work.
As of this writing a wooden bridge can be purchased at
Guitar Parts Factory or at
Allparts.
Though rare, I've seen original Ampeg bridges online at Ebay or Reverb auction sites at times.
|
|
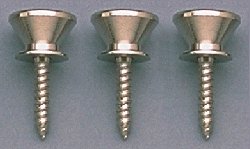
Another fairly common replacement need are strap buttons. Many people put some type of Straplock system on their instruments, but
later - when it comes time to replace the originals the strap buttons are often not to be found. At left, Danelectro strap buttons are
remarkably similar to those used on the Dan Armstrong · Ampeg instruments as they feature a wider flare to them but
they are getting harder to find. The closest thing that I can find are at
All Parts though longer screws
may be required.
|
|
Next in line is a combo type tool that shipped with the Dan Armstrong instruments for removing screws and making truss rod adjustments. Over
the years most of these have been lost. This tool features a socket on one end and a phillips screwdriver that makes up the end of the handle.
Together, one can loosen the truss rod cover on your Dan Armstrong instrument's headstock then use the other end of the tool to tighten or
loosen the truss rod on your Dan Armstrong guitar or bass. This tool can be acquired
here.
The Dan Armstrong · Ampeg guitar and bass instruments require the 5/16s socket.
|
|
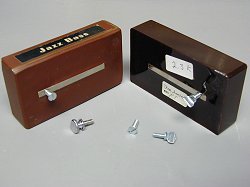
Replacement scratchplate screws are another item that's up there on everyone's list. After many years of
playing on a Dan Armstrong instrument such screws can either get rusted or lost altogether.
As such, I've been using Gibson style scratchplate screws part #4387 from
Stew-Mac
which is the screw seen at the far left. The screw at the far right is the original Dan Armstrong · Ampeg
scratchplate screw.
|
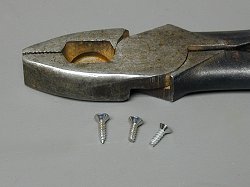
The screw in the middle is the Stewart McDonald part #4387 Gibson style screw that has been altered. Notice again the
Gibson style screw at the left and how it comes to a point - for turning into a wooden body. Now notice the original
scratchplate screw that I removed from my 1970 Dan Armstrong · Ampeg bass guitar at the right.
Notice how it has a flattened end on it - for turning into the pre-threaded holes in the acrylic body. Seen better in enlarged view,
the screws have the same type of threads, so I took a pair of pliers (I used Lineman type pliers) to grip the head of
the screw as I ground the pointed end of the screw flat using a bench grinder. Care must be taken to get the screw
ground down the proper length, and one must proceed slowly when inserting the screw into the holes on the acrylic body
but if you've done it correctly, the screws will easily turn in without disturbing the original tapped threads in the acrylic body.
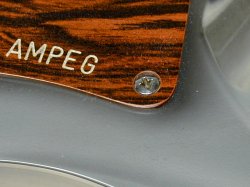
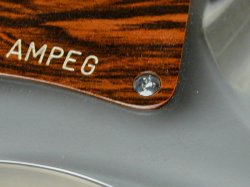
At upper left, a photo of my Dan Armstrong bass with the original screw securing the scratchplate to the body. At
upper right, the same thing only with the aforementioned (and slightly modified) Stewart McDonald scratchplate screw
resides in place of the original screw. Notice the extra shine to it, mostly because it is new, but also because I made
the mistake of ordering mine in chrome. I believe they are now only available in nickel which is more like the original screws anyway.
The actual screw head of the Stewart McDonald Gibson style screw is a bit larger than the original Ampeg screw head,
but ironically that's a good thing, for as can be seen here, when comparing the two side by side, the replacement
screw actually fits and fills the flared screw hole of the scratchplate better than the original screw does.
continue
menu
Names and images are TMand © Dan Armstrong / Ampeg. All rights reserved.
All other names and images are TMand © of their respective owners. All rights reserved.
|
| |