The fingerboards for the acrylic guitars and basses are built from Brazilian rosewood. Matt Umanov stated that "Brazilian rosewood was the common type of rosewood to
use at the time, considered by far the best and nothing out of the ordinary; Danny may have chosen that over ebony because of its feel."
Today, Brazilian rosewood is highly desired among musicians, somewhat due to it's rarity, but also because it is less fibrous, and a
somewhat more harder, denser wood than Indian rosewood. Although it is a harder wood to work with, being it is a very brittle wood, it tends
to reflect sound more, while also producing a somewhat more brighter sound than Indian. Because Indian rosewood is more porous, it has a
tendency to dry out more, whereas Brazilian retains more of its oil, and many musicians feel it offers a much smoother playing surface
overall. That being said, the owners manual for these instruments state that 'it may be necessary, at times, to apply a light but thorough
application of lemon oil' to keep the rosewood from drying out and cracking, suggesting that all types of rosewood needs to be kept somewhat
oiled. Many luthiers these days suggest using linseed oil rather than lemon oil. The necks themselves are based on Gibson style
'short-scaled' necks - 243/4" for the guitar and 301/2" for the bass.
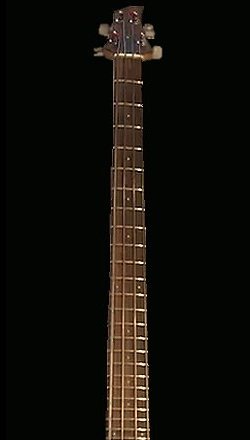
Like the neck, the fingerboards are built from quarter-sawn wood, and features 24 frets on it, all free of the body due to its front bolt-on
design. According to Matt Umanov "Using 24 frets was Dan's idea.
Matt Davis writes in to say "I had an interesting talk with Jerry Proctor, President of St. Louis Guitar Shop. Apparently St. Louis
Music had some kind of repair situation set up with Ampeg. Jerry worked WITH DAN on the re-issues. He told me about why Dan wanted 24 frets
on the guitar. It was some old jazz song I'd never heard of...but I think it was a woman's name like... Lucille or something. Apparently the
very last note was the high E on the 24th fret - and Dan wanted to be able to nail that note. Jerry said it sounded crazy, and he
wouldn't have believed it had Dan not personally told him."
In the Brochures section of the site - Dan was interviewed
by Tom Wheeler where he talks more about the 24 fret neck. I also remember reading an interview with Dan where he was asked
"Why 24 frets"? To which Dan replied "Because I could do 24 frets".
One thing I have always wanted for my Dan Armstrong guitar is a notched straight-edge. Unfortunately, given the guitar has a 24 fret neck and a scale length of 24.5 inches there were
just none out there for sale. As a result, I've often entertained the idea of contacting or visiting a machine shop to have a notched straightedge custom made for my Dan Armstrong
guitar. But then one day while surfing the web I found myself at the Instagram web site where I discovered some postings by Mr. James Roadman of
Roadman Guitars.
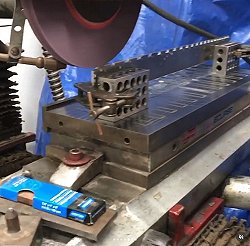
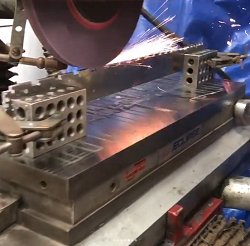
As I clicked my way through images of his repairs to Dan Armstrong instruments I soon came across some videos of him custom machining a
notched straight edge for a guitar with the same scale length as the
Dan Armstrong · Ampeg guitar that was made from steel, rather than aluminum. I thought steel??? Even better!!!
Below are some images of his manufacturing process seen at Instagram.
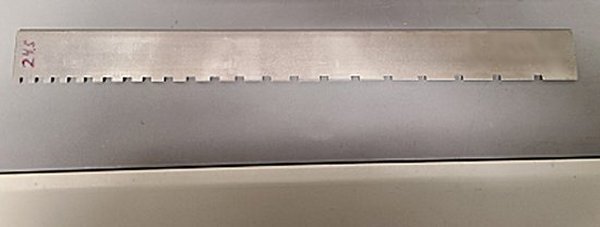
Seen above is the notched straightedge that James made for me. Being it's made of steel it's much heavier than my other straightedges made of aluminum. Sharp eyes may have noticed
that it only features 21 'notches' in it. The trick is to place the first notch over the third fret, and the rest all fall into place. More than enough to know if a truss rod
adjustment is needed. However, if notches for all 24 frets are desired, James can accomodate your needs.
I remember asking James why it is that nobody seems to produce a notched straight-edge for the Dan Armstrong · Ampeg instruments and he stated "I would
imagine that it's because the Dan Armstrong instruments were only produced in limited numbers when compared to those of Fender and Gibson guitars. It's only natural that retailers
would put emphasis on stocking straightedges for these brands, given the larger amount of instruments that have been produced."
However, for anyone interested in a notched straight-edge machined for your Dan Armstrong guitar or bass, you can contact Mr. Roadman at the bottom of his web site
here.
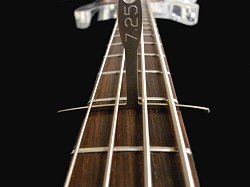
At left, the fingerboard on my guitar models feature a 9.5" radius while on the right my bass shows a 7.25" radius for playing comfort.
The neck profiles of my 1969 model and my 1970 bass have a C shape neck, though my 1970 guitar neck had more of
a D shape to it. But it must be remembered that the necks had changed significantly after 1969.
While Dan made set-in necks later on in his career he once mentioned to me that "bolt-on necks are still very desirable
to me, and I guess it's because I tend to look at it from a technician's point of view. You see, with a bolt-on neck, you
have an extra adjustment point to work with than a set-in neck has. In order to get good, low string action with a set-in neck,
once you get the truss rod straight, you only have one other tool to work with, and that is the height adjustment of the bridge.
But with a bolt-on neck you get all of that, plus you can also install or remove shims between the body and the base of the neck
to tilt the neck one way or another. So it's more of a technician's preference that I tend to have."
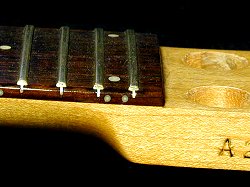
As seen at left and right, the fingerboards for the guitar and bass are all fitted with smaller (3mm) pearloid dot position markers on the top of the
fingerboard, and even smaller dot type position markers on the side of the fingerboard. The dots begin at the 3rd
fret and continue on up to and including the 24th fret. As the next two photos reveal, both the 12th fret and the
24th fret are fitted with double dots, used to designate the octaves.
Like most everything else when it came to these guitars, Dan delegated the project of the position markers out to Matt
Umanov but when it came to 'the type' of position markers Matt remembers a somewhat more collaborative effort, stating "The
best I can recall, it was either Dan or myself who said something like "little ones would look real cool", and that was
that."
Dan explained his choice of position markers long ago to me, stating "Les Paul Customs, for example, use large blocks for position
markers and as a result, do not have a consistent feel from fret to fret. Bending strings on a fret that has the large position markers has
quite a different feel to it than when bending strings on a fret without a position marker. I wanted the neck on my guitars to feel the
same everywhere, regardless which fret was being played, so I used smaller position markers."
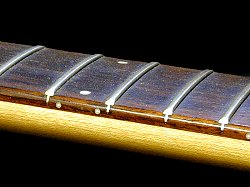
The fret wire feels similar to Dunlop 6130's. Measuring in at 2.54mm wide by 1.4mm high they are like many other guitars on
the market. However, that is where much of the similarity ends, as Dan was not one to install frets like other manufacturers.
According to Dan "fret wire is extruded, or pulled through a die, and as a result is 'work hardened' - thus it has a very
hard surface, much harder than any guitar string and will last the life of the guitar as long as they are not filed or ground
down. The frets were carefully pressed in place using a press and gauge."
Years later Dan said "I was never one to hammer in frets into the fingerboard. I really don't believe in using a hammer
on any guitar and especially not for installing frets. The hammering 'blows' affect the wood, shocks it - if you get my
meaning". It also weakens the fret itself. These things may sound trivial, but a player or anyone else with a fine ear,
can hear dead spots on instruments fretted like this when the instrument is played. I did everything I could do to make my
guitars ring and sustain like a steel guitar, with no dead spots. Thats why we pressed our frets in place."
Luthier Bill Richardson, who studied under Dan agrees, saying "I agree with Dan that using a metal hammer can dull the
metals strength but the real problem is hammering the heck out of the slot just makes for an unpredictable and slightly
loose slot, no matter how hard ya hit it - it will never seat properly and when ya wanna hit that note, it don't ring at
all. Dan taught me to tap on the frets with the end of a 6" ruler and listen for a 'solid' sound and when ya hear a
dulled lower pitched one...ya got a loose fret. Now when that happens ya certainly can't level any frets as the loose ones
just keep rising up and you have a total nightmare on your hands ...let alone a bunch of instruments coming down the
assembly line."
He continues stating "pressing them in using an arbor press like Dan did, and as I do, one gets a better feel on the
install and Dan's real point was to not mess with the tensile strength of the metal. After you mutate a fret and mess with
its strength and say, pull it out and straighten it out and try to reinstall it - it never goes in the same. Did ya ever
pull out a bent nail and try to straighten it out and re-pound it...even after ya made it look straight? It never goes and
bends exactly at the original fatigued point. Also, very important to Dan was if this pressing in was done right you would
eliminate the dreaded filing/levelling of frets, which in a production scenario is a big time saver (very important to bean
counters)."
Bill wraps up saying "We have to remember Dan saw many guitars and bass's come into his shop let alone the ones he saw
on gigs etc. and many were having issues with problems like these. His business was started because of the fact that many
guitars simply were built not paying attention to these details."
|
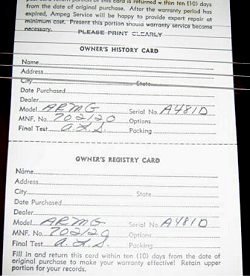
Once completed, every instrument was checked over and had to pass inspection. One such person was Art Storley, who would check over the guitar,
as well as the necks looking for any imperfection, and if necessary, did minor adjustments. Here you can see Art Storley's initials in the
'final test' section of a registration card that accompanied this instrument.
After this final test, the instrument awaited Dan's personal inspection and final OK before it was shipped to the
various Ampeg dealers.
|
|
For a string nut, Dan chose to use ivory. He had witnessed first hand how Matt Umanov had used ivory, and he had come
to learn and appreciate the tonal quality and additional sustaining capabilities of the instruments that Matt installed
ivory nuts onto. When it came time to build Dan's prototype, it wasn't even a question. Dan wanted ivory nuts on his
new clear guitars as well.
As fate would have it, for a time Matt Umanov was the only man to go to for ivory in the New York area. Once production
began, Dan &/or Ampeg would purchase their ivory from Matt Umanov. Matt goes on to say "Eventually they found their own
supply source as after awhile I didn't hear from them anymore."
|
|
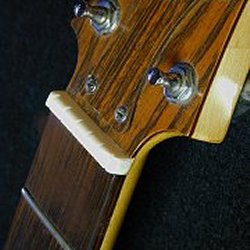
The headstock featured a 14° angle relative to the fingerboard, and it's unique design came about in roughly the
same way the body style did. Matt Umanov had built the prototype neck for Dan, and had made the headstock fairly
similar to the headstock design of the 1924-1934 Gibson L5 guitar like the 1928 model shown at left. But near it's
completion Matt realized the problems associated with producing and marketing something too close to another makers
design. In brief, he was having second thoughts.
Matt went on to say.... "I told him Danny, we have to change the shape of this headstock or they're going to come
after us with a lawsuit. From there Dan just picked up a pencil and drew a curved line near the top of the headstock
and said 'make it like this' and that's how the headstock got it's shape."
Matt summed it all up, stating "I took that early peghead and exaggerated it a bit, and Danny lopped
off the top, and exaggerated the whole thing a bit more." The animation at left gives an idea as to the headstocks
origin, and how quickly Dan had come up with the design for it.
|
continue
menu
Names and images are TMand © Dan Armstrong / Ampeg. All rights reserved.
All other names and images are TMand © of their respective owners. All rights reserved.
|
| |