|
|
When it came to the pickups, there were several challenges to overcome. Tom goes on to state "The original RT pickup that came with the guitar was cut, or shaved down in width in
order to make it fit in the body. Ironically, even after being shaved down it still wouldn't fit in the sliding channel but it would fit in the area directly behind the
neck as that area is a bit wider than the sliding channel. Even then, it had to be installed by pushing straight down on it directly behind the neck. I bought a modern RT and ST pickup
from Aaron Armstrongs shop here in the UK, thinking they could be thinned down on the sides to be able to slide them in the channel and onto banana plugs that we would mount on a
bracket, or wall.... much like what they did for the black butyrate Dan Armstrong guitars back then.
Unfortunately Angela noticed that the curve of the rout for the control cavity on my guitar starts sooner than the latter made guitars (including the black models). As a result, the
banana plugs would have stuck into the pickup cavity area too far. As a result, the pickup wouldn't seat in far enough and the pole piece of the pickup wouldn'tt even be under the top E
string. This is when I noted that the bass guitar pickups were thinner in width than the guitar pickups and that the control rout on the body of my guitar ironically matched the
dimensions of the bass pickups rather than the guitar pickups. As a result, I asked Kent if he could make me some guitar pickups but make them within the confines of the more narrow bass
guitar pickup enclosures."


|
|
At left and right, from top to bottom is the ST, CB, RT and RB pickups that Kent Armstrong custom made for Tom using the molds for the Dan Armstrong bass pickups. However, they were
made with a bit different connection terminals than the standard bass models employ.

|
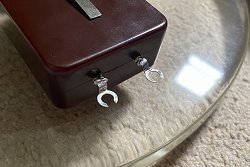
Along with the guitar pickups Kent also sent Tom some grounding lugs that Tom could use to make the electrical connections from the pickups to the control cavity.
|
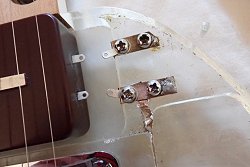
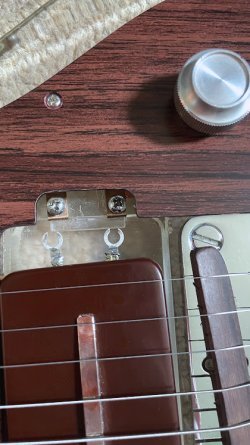
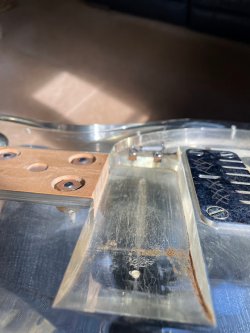
Above left, and with the banana jacks out of the question, Tom looks for another way to make the pickups easily interchangeable on his guitar. He starts by placing two of the grounding
lugs (seen just above) under the connection screws on his guitar body and bends them upwards to where they meet up with the connection tabs of the pickups like the one seen in the
upper right photo.
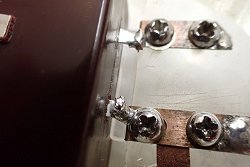
At left, Tom had an epiphany of sorts as he realized if he cuts away a portion of the grounding lug, and solders that lug to the tab that protrudes from the pickup, that it would allow
for fairly quick and easy pickup changes.
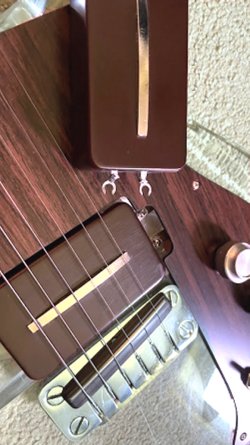
Seen at left, a Kent Armstrong pickup rests on the guitar with the newly soldered lugs with the front portion of the lug cut away in order to make it slide both under and into the
pickup connection screws. At right, and with the pickup in the channel it's ready to be slid under the phillips screw heads and tightened down. In both photos, notice the cutaway
portion of the scratchplate to make it possible to quickly change the pickups in and out.
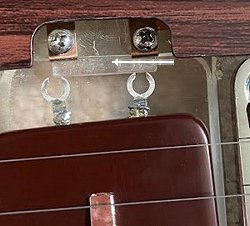
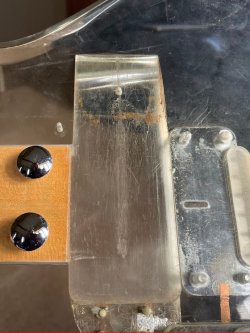
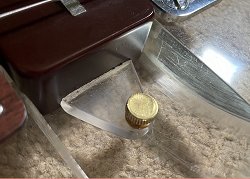
When sliding the interchangable pickups onto the connection screws Angela's son Tig pointed out that a 'stop'.... of sorts ... was needed so that the pickups would not get
'slammed' onto the connection screws and eventually ruin both the connection means of the guitar, as well as the pickups. As seen at left, and highlighted by the white arrow,
Angela stated that "Tig cut out a piece of acrylic to act as a spacer and a stop..... of sorts - so that the pickups won't get rammed into the connection screws. The spacer
is held in place with double sided stick tape on the bottom of it. Being placed alongside the acrylic wall - it's secure enough to work, but more importantly, it's not a permanent
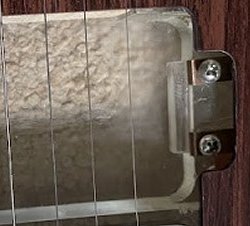
fixture nor is it a mod." At right, another, and better look at the spacer.

|
|
At left, and from day one, I had noticed a hole that was drilled and tapped in the pickup channel and wondered what it was for. I was even more perplexed at right, when I saw a
pickup thumbscrew turned into that hole as I just couldn't help but wonder what the point of all this was.
|
|
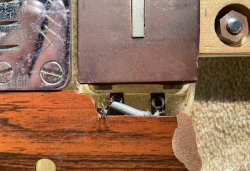
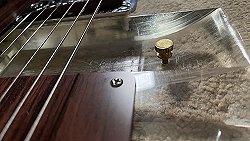
At left and right is when I finally got the point. To make sure that the modular pickups would not accidentally disengage from the control cavity connection screws, someone at Ampeg
had made and tapped a hole in the pickup channel. Tig decided to put the threaded hole to good use, first by taking a piece of acrylic and cutting it into a somewhat triangular shape.
Next, he drilled a hole in one corner of the triangular piece just large enough to accept a 6/32 machine screw which in turn, then, threads into the matching threads of the hole in
the pickup channel. By sliding a pickup onto the connection screws and tightening them down, then turning the triangular piece of acrylic until it's up against the pickup and then
tightening down its 6/32 thumbscrew, the pickup is snugly secured to the body as well as to the connection screws. In a nice touch of class, not to mention functionality - Tig used
a Dan Armstrong pickup thumbscrew to tighten the triangular piece of acrylic down as they too are 6/32 machine screws.

|
|
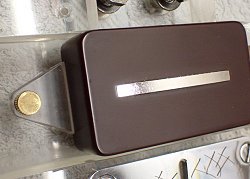
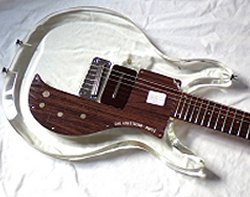
Above left and right, Tom stated "The original scratchplate that accompanied the instrument was broken in half - with the front half missing which forced me to find a
replacement. Using this site as a reference I contacted Pickguard Planet for a replacement.
I realized that I had a somewhat special request but to be honest, they were not the easiest to work with. Given this guitar, there was some back and forth on trying to find the
best fitting guard and I eventually settled on an early bass pickguard. As you maybe know, the early bass pickguards lacked a hole in the plate for the pickup selector switch as
the bass models did not have a switch until the 1971 models. Eventually, I asked Angela to add an the extra hole for the selector switch as well as the screw holes to secure the
guard to the body. On a positive note, the stock plate does have the Dan Armstrong · Ampeg white lettering on it, which is nice."
Tom continued, stating "However, I ordered extra material as I wanted a second pickguard made. In addition, I needed even more material for the headstock and matching truss rod
cover as the headstock veneer was badly scratched/marred, and there was no truss rod cover." While all this is understandable, why the additional material for a second
pickguard?
At left, Tom asked Angela if she would make him an additional scratchplate with the extra pickguard material that he had purchased. However, this second plate would not be like the
stock scratchplate that he had ordered - as he asked Angela to make it so that it would feature a small cutaway in the plate where the pickup connection screws lie - much like what
is seen at right which is a partial plate that was on the acylic body when Tom received it. Being this 'extra' plate was made from additional scratchplate material there is no white
Dan Armstrong · Ampeg lettering on it.
next
menu
Names and images are TMand © Dan Armstrong / Ampeg. All rights reserved.
All other names and images are TMand © of their respective owners. All rights reserved.
|
| |